"Upholstery Repair Made Easy"
Categories Tricks & Help:
Tricks & Help:

Primary Colors:
RED will lighten very dark colors, while also changing the tone.
BLUE will darken light colors, while also changing the tone.
YELLOW will lighten semi-dark colors, while also changing the tone.
GREEN will darken light colors, while also changing the tone.
Shade Colors:
BLACK will always darken all colors.
WHITE will always lighten all colors.
GRAY is a mixture of 50% white and 50% black. Light gray has more white. Dark gray has more black.
Tone is the Dominant primary color. Tone may consist of two different primary colors. Red + Yellow = Orange ect...
Shade is the Lightness or darkness of a color. Primarily controlled by white and black.
Secondary Colors:
Brown 33.3% black + 33.3% red + 33.3% yellow.
Orange 50% red + 50% yellow.
Green 50% blue + 50% yellow.
Purple 50% red + 50% blue.
Cyan 50% blue + 50% green.
Pink 50% red + 50% white.
Light Green 50% green + 25% yellow + 25% white.
Tan 50% brown + 50% white.
Dark Brown 50% black + 25% red + 25% yellow.
Off White 90% white + 10% brown or yellow.
Helpful Color Matching Tips:
1. When adding black to your color match, a couple of drops will do the trick! Black can change the tone of your color rather easily, so use black in small drops.
2. When adding white unlike black, you can be more liberal. White added to your color match can make the color a little milkey so do not go overboard with white!
3. This may sound a bit strange, but if a color match is just a bit off, add a few drops of red or orange. Sounds funny, but this trick will work with almost any color except white.
4. This trick is called muddy it up. Most of your upholstery/fabric has aged due to use, so your original will have faded or has worn. In this case add a few drops of brown, this will blend your new color with existing color. You just muddied it up!
5. Mix your colors in a 5oz. wax coated paper cup. This will allow you to set mistake colors aside to possibly use later. These cups will allow you to view your color mixes better, and sometimes the mistake colors can be added to your new color so you achieve the perfect color match. You can also save it for use at a later date, in a small plastic bottle.
6. Paper cups can also serve in another purpose, you can use them to spray dye from. Take your spray unit, and dip the spray tube directly into the cup with your color and spray. You will now have one less thing to clean, and you can just toss the used cup away when you have finished with it.
7. If you are running low on your premixed dye, and it took a while to match the color, no worries! Add some high gloss clear to your dye, this will stretch out your color enough to finish the job! This will also work with a few drops of water, since you are working with a water based product.
8. Getting a color match using fabric fibers. mix the fibers in a paper cup as you would mix a few colors of paint together. Combine fibers and sift through a kitchen sifter, or use the screen shaker provided in your kit. After sifting, take the pallet knife and stir for a more uniform mixture. Next take a pinch of your mixed fibers, and sprinkle some over your repair. If the color match seems good, you're done and ready for the repair process! If the color seems a little off, add a pinch of one of the other colors in your fabric kit. A little trial and error will lead you to the perfect color match.
9. Think of your fabric fibers as you would paint. Combine colors to get to the desired finished product! These fibers are designed to be blended together, and can match almost any fabrics color.
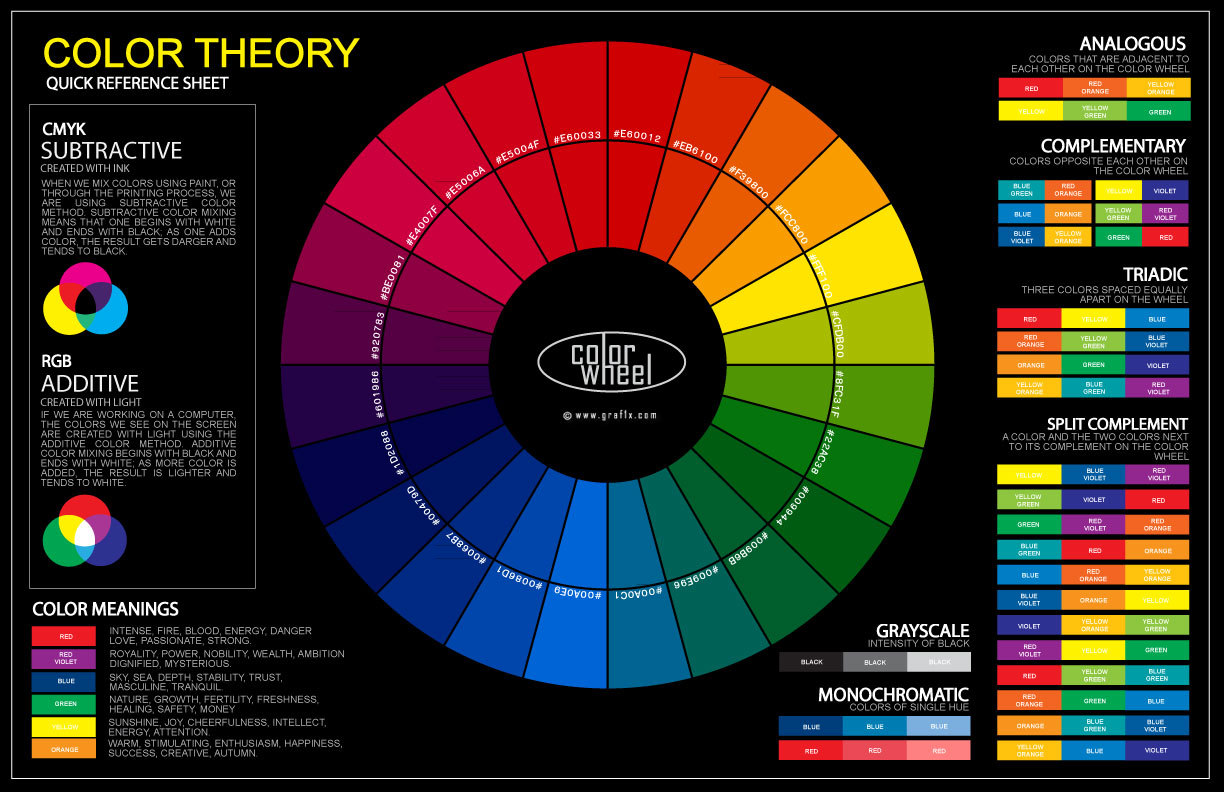
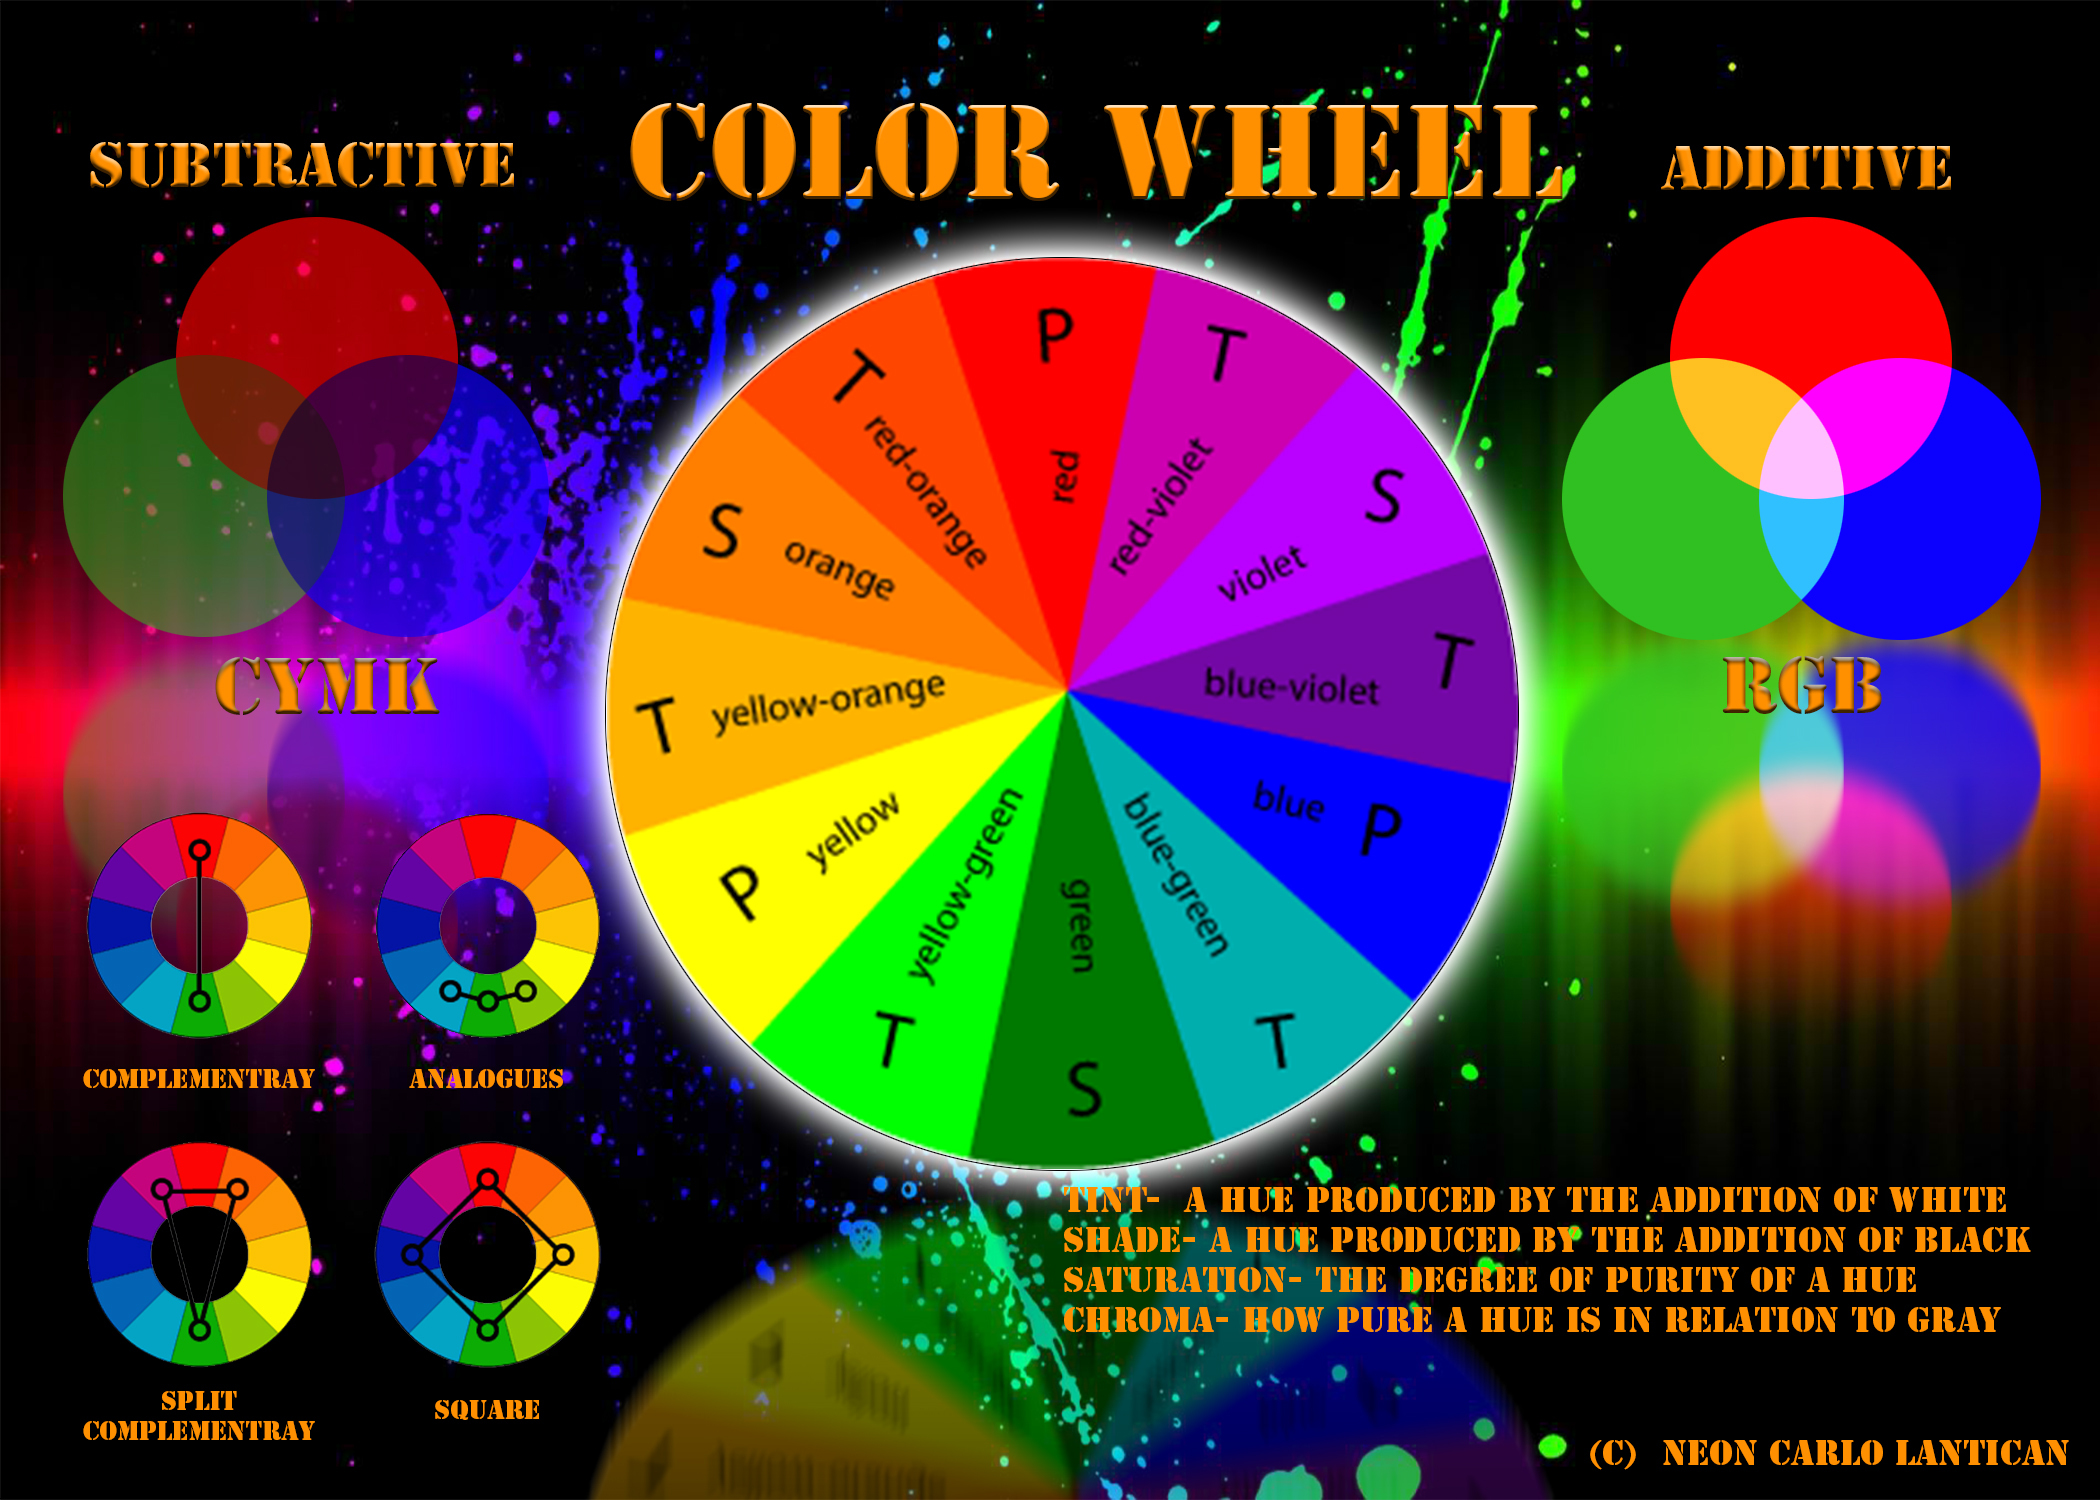
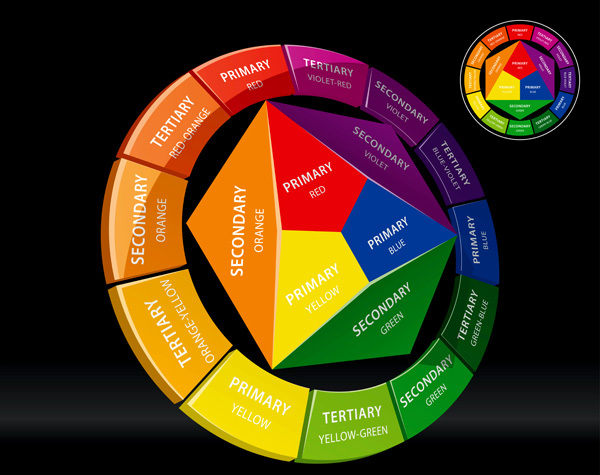
10. For more help mixing colors, get a small paper color wheel for your local hardware store, or art supply shop. Color wheels are cheap, and will come in quite handy for all sorts of do-it-yourself projects!
Color wheels to help you in the theory of color!
Tip #1: Always clean area to be repaired. Warm water and mild dish soap will do. Remove all visible dirt, for a very dirty area use a soft bristled brush. Make sure the upholstery is dry to touch. This will ensure you get good adhesionfor your repair and dye.
Tip #2: Before you use any product, make sure they are mixed thoroughly. Repair compound can be mixed with your pallet knife. Compound has a consistency of frosting, so make sure to mix it well. Dye will only need a few shakes (lid closed securely). Fabric fibers should be mixed through a screen shaker or sifter. Mix fibers on a paper plate and set it aside, you can always save what is not being used.
Tip #3: Use waxed coated paper cups (3 or 5 oz.) to mix dyes and fabric fibers in. This will make for easy clean-up.
Tip #4: Always apply the repair compound in thin even coats. This will ensure each layer is cured thoroughly, and lead to a much stronger repair. Do not be afraid to use 3 or 4 coats, it will payoff in the end.
Tip #5: Use mini-mesh and sub-patch to keep large repairs from sagging. Mini-mesh is the thinner of the two rolls in your kit. Sub-patch is the thicker of the two. Always cut mesh 1/2 inch larger then your repair. Mini-mesh will go over your repair, Sub-patch will go under the hole. Always center mini-mesh and sub-patch on your repairs.
Tip #6: Remember after appling heat to a repair, do not apply much pressure. The heat from the repair will suck into the cool grain pad.
Tip #7: The repair compound has a little helper built in it. When you see white vapor (smoke) you have added enough heat and the compound is now fully cured. The new heated area is very hot, so be careful. You may want to use a cloth or glove on your hand, if it feels to warm to the touch.
Tip #8: When you apply the grain pad onto your heated repair, apply and count to 5. The grain will now be embedded into the repaired area. You can always add a deeper grain without adding more compound. Just reheat the repair and reapply your grain pad. You may want to apply alittle more preasure the second time?
Tip #9: The grain and texture process is very important, so always leave a nice grain embedded into your repairs. This step will help make your repair invisible after the dying process.
Tip #10: When dying (coloring) your repair use long even, thin coats. Thin coats will always work better, and last longer. Three coats should be plenty, lighter colors may need mor coats then darker ones. Give the dye about 5 minutes in between coats to setup. The dye will totally dry within 30 minutes. This stuff dries pretty quick!
Tip #11: Use clear topcoat to achieve the correct shine. High gloss clear coat is used if a bright shiny (wet look) is needed. This look is standard in most vinyls. Low luster clear coat is used if a matte (dull look) is needed. This look is standard in most leathers.
Tip #12: Gloss and dullers are known as topcoats (applied after the dying process). You can also add topcoats directly to your dye. The dye in itself has a gloss, so if you need more shine add a little high gloss to your dye. This will achieve a little less shine then straight high gloss on top.
Tip #13: Use low luster clear to achieve the desired shine. Add about 1/4 oz. of duller to each 1 oz. of your color matched dye. This will give you a semi-gloss (medium) glossy finish.
Tip #14: Using a protector on your new repairs. Give the repair 2 days before you apply a protector. Use a leather protector for leather materials, and use a vinyl protector for vinyl materials. It is a good idea to add a protector to your upholstery. This will add much needed oils to your upholstery. Protectors will soak into the pours and give your fabric more elasticity.
Tip #15: Some surface scuffs can be repaired without the use of compound. Be careful, always use your heat gun on the low setting when using this trick. Heat damaged area and apply your grain pad. Use medium pressure pushing down for 5 seconds. Hit the repaired area with a coat of dye, and your done! This is a great trick if you have pets who like to scratch your leather upholstery.
Tip #16: Match your fabric fibers the same way you would your dye. The fibers are designed to mix and match just like paint.
Tip #17: Fabric repairs using your fabric fibers. Mix your base color in a dixie cup. Take a pinch of your colored fibers and add it to a drop of base glue (glue in the tube). The amount of glue will depend on the size of your repair. Mix it well, until you have a ball the size of a marble. This is your base repair compound used to fill the hole.
Tip #18: This tip will help in repairing minor cloth damage. Spread the base glue over damaged area with your pallet knife. Sprinkle your fiber color match over the glue with your screen shaker. Take a piece of waxed paper and place it over your repair on top of the glue and fiber mix. Now with your fingers press down and flatten fibers into the base glue. Peel back the waxed paper slowly. Let the repair sit untouched for 2 hours. After dry take a small brush and lightly fluff up the fibers.
Tip #19: This tip is for major damaged cloth. Locate your roll of sub-patch (thick mesh). Cut out a piece about 1 inch larger then the hole. Lift the material and place the sub-patch under the repair, flatten without wrinkles. Now use the repair steps in Tip #18.
Tip #20: Applying fibers using the screen shaker. Locate the shaker (strainer) and spray adhesive (liquid glue in a bottle), and your spray unit. You can spray the glue from the bottle or use a dixie cup! With your color matched fibers already matched, and the hole filled with base glue fiber mix go to the next step. Spray your adhesive (spray glue) about 1 inch in diameter larger then the repair. Load your screen shaker with your color matched fibers. Slowly shake fibers onto the wet glued area. Now let dry about 15 minutes. Fibers should look like they are standing up, this is the proper look for velour.